You can batch receive items through a simple or an advanced interface. The simple interface does not allow you to add barcodes or use the copy template. These items are also not visible in the OPAC. The advanced interface enables you to use the copy templates that you created, add barcodes, and make items OPAC visible and holdable.
You can access both Batch Receive interfaces from two locations in the ILS. From the Subscription Details screen, you can click Batch Item Receive. You can also access these interfaces by opening the catalog record for the serial, and clicking Actions for this Record → Serials Batch Receive.
Follow these steps to receive items in batch in a simple interface.
-
The Batch Receive interface displays issues that have not yet been received. The earliest expected issue appears at the top of the list.
-
In the right lower corner, you see a check box to Create Units for Received Items. If you do not check this box, then you will receive items in simple mode.
-
Click Next.
-
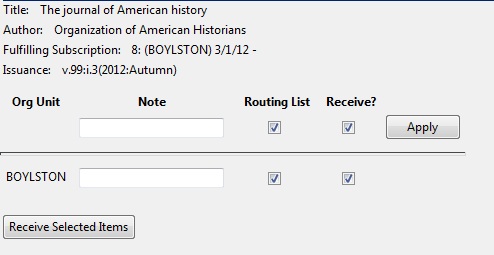
In simple mode, the distributions that you created are displayed. They are marked received by default. If you hover over the branch name, you can view the name of the distribution and its stream.
-
You can receive and add a note to each item individually, or you can perform these actions on all of the distributions and streams at once. To do so, look above the line, and enter the note that you want to apply to all copies and confirm that the box to Receive is checked.
-
Click Apply. The note should appear in the note field in each distribution.
-
Then click Receive Selected Items.
-
The received items are cleared from the screen.
Follow these steps to receive items in batch in a simple interface.
-
The Batch Receive interface displays issues that have not yet been received. The earliest expected issue appears at the top of the list.
-
If you want to barcode each copy, display it in the catalog, and make it holdable, then check the box adjacent to Create Units for Received Items in the lower right side of the screen.
-
This will allow you to utilize the copy templates and input additional information about the copy:
-
Barcode - You can scan printed barcodes into the barcode field for each copy, or you can allow the system to auto-generate barcodes. To auto-generate barcodes, check the box adjacent to Auto-generate, and enter the first barcode into the barcode field in the first row of the table. Then press the Tab key. The remaining barcode fields will automatically populate with the next barcodes in sequence, including check digits.
-
Circ Modifiers - The circ modifiers drop down menu is populated with the circulation modifiers that you created in Admin → Server Administration → Circulation Modifiers. If you entered a circ modifier in the copy template that you created for this subscription, then it will appear by default in the distributions.
-
Call Number - Enter a call number. Any item with a barcode must also have a call number.
-
Note - Add a note. There are no limits on the number of characters that can be entered in this field. The note only displays in this screen.
-
Copy Location - The copy location drop down menu is populated with the copy locations that you created in Admin → Local Administration → Copy Location Editor. If you entered a copy location in the copy template that you created for this subscription, then it will appear by default in the distributions.
-
Price - If you entered a price in the copy template that you created for this subscription, then it will appear by default in the distributions. You can also manually enter a price if you did not include one in the copy template.
-
Receive - The boxes in the Receive column are checked by default. Uncheck the box if you do not want to receive the item. Evergreen will retain the unreceived copies and will allow you to receive them at a later time.
-
When you are ready to receive the items, click Receive Selected Items.
-
The items that have been received are cleared from the Batch Receive interface. The remaining disabled item is an unreceived item.
-
If the items that you received have a barcode, a copy template that was set to OPAC Visible, and are assigned a shelving location that is OPAC Visible, then you can view the received items in the catalog. Notice that the Holdings Summary has been updated to reflect the most recent addition to the holdings.
Evergreen will now display an alert if a duplicate barcode is entered in the Serials Batch Receive interface. If a staff member enters a barcode that already exists in the database while receiving new serials items in the Serials Batch Receive interface, an alert message will pop up letting the staff member know that the barcode is a duplicate. After the staff member clicks OK to clear the alert, he or she can enter a new barcode.


