Providers are the vendors from whom you order titles.
-
To add a provider record, select Admin > Server Administration >
Acquisitions > Providers.
-
Enter information about the provider. At a minimum, you need to add a
Provider Name, Code, Owner, and Currency. You also need to select the
Active checkbox to use the provider.
Distribution Formulas (Optional)
If you are ordering for a multi-branch library system, distribution formulas
are a useful way to specify the number of copies that should be distributed to
specific branches and copy locations.
-
To create a distribution formula, select Admin > Server Administration >
Acquisitions > Distribution Formulas. Click the New Formula button. Enter
the formula name and select the owning library. Ignore the Skip Count field.
-
Click New Entry. Select an Owning Library from the drop down menu. This
indicates the branch that will receive the items.
-
Select a Shelving Location from the drop down menu.
-
In the Item Count field, enter the number of items that should be distributed
to that branch and copy location. You can enter the number or use the arrows on
the right side of the field.
-
Keep adding entries until the distribution formula is complete.
Helpful acquisitions Library Settings
There are several acquisitions Library Settings available that will help with
acquisitions workflow. These settings can be found at Admin > Local
Administration > Library Settings Editor.
-
Default circulation modifier - Automatically applies a default circulation
modifier to all of your acquisitions copies. Useful if you use a specific
circulation modifier for on-order copies.
-
Default copy location - Automatically applies a default copy location (e.g.
On Order) to acquisitions copies.
-
Temporary barcode prefix - Applies a unique prefix to the barcode that is
automatically generated during the acquisitions process.
-
Temporary call number prefix - Applies a unique prefix to the start of the
call number that is automatically generated during the acquisitions process.
Preparing for order record loading
If your library is planning to upload order records in a batch, you need to add
some information to your provider records so that Evergreen knows how to map
the copy data contained in the order record.
-
Retrieve the record for the provider that has supplied the order records by
selecting Admin > Server Administration > Acquisitions > Providers. Click on
the hyperlinked Provider name.
-
In the top frame, add the MARC tag that contains your holdings data in the
Holdings Tag field (this tag can also be entered at the time you create the
provider record.)
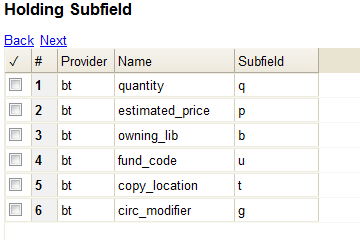
To map the tag’s subfields to the appropriate copy data, click the Holding
Subfield tab. Click the New Holding Subfield button and select the copy
data that you are mapping. Add the subfield that contains that data and click
Save.
If your vendor is sending other data in a MARC tag that needs to be mapped to
a field in acquisitions, you can do so by clicking the Attribute Definitions
tab. As an example, if you need to import the PO Name, you could set up an
attribute definition by adding an XPath similar to:
code => purchase_order
xpath => //*[@tag="962"]/*[@code="p"]
Is Identifier => false
where 962 is the holdings tag and p is the subfield that contains the PO Name.
Preparing to send electronic orders from Evergreen
If your library wants to transmit electronic order information to a vendor, you
will need to configure your server to use EDI. You need to install the EDI
translator and EDI scripts on your server by following the instructions in the
Evergreen 2.3 documentation.
(http://docs.evergreen-ils.org/2.3/_installation.html)
Configure your provider’s EDI information by selecting Admin > Server
Administration > Acquisitions > EDI Accounts. Give the account a name in the
Label box.
-
Host is the vendor-assigned FTP/SFTP/SSH hostname.
-
Username is the vendor-assigned FTP/SFTP/SSH username.
-
Password is the vendor-assigned FTP/SFTP/SSH password.
-
Account This field enables you to add a supplemental password for
entry to a remote system after log in has been completed. This field is
optional for the ILS but may be required by your provider.
-
Owner is the organizational unit who owns the EDI account
-
Last Activity is the date of last activity for the account
-
Provider is a link to the codes for the Provider record.
-
Path is the path on the vendor’s server where Evergreen will deposit its
outgoing order files.
-
Incoming Directory is the path on the vendor’s server where Evergreen
will retrieve incoming order responses and invoices.
-
Vendor Account Number is the Vendor assigned account number.
-
Vendor Assigned Code is usually a sub-account designation. It can be used
with or without the Vendor Account Number.
You now need to add this EDI Account and the SAN code to the provider’s record.
-
Select Admin > Server Administration > Acquisitions > Providers.
-
Click the hyperlinked Provider name.
-
Select the account you just created in the EDI Default field.
-
Add the vendor-provided SAN code to the SAN field.
The last step is to add your library’s SAN code to Evergreen.
-
Select Admin > Server Administration > Organizational Units.
-
Select your library from the organizational hierarchy in the left pane.
-
Click the Addresses tab and add your library’s SAN code to the SAN field.