Creating invoices and adding line items
You can add specific line items to an invoice from the PO or acquisitions
search results screen. You can also search for relevant line items from within
the invoice interface. In addition, you can add all line items from an entire
Purchase order to an invoice or you can create a blanket invoice for items that are not
attached to a purchase order.
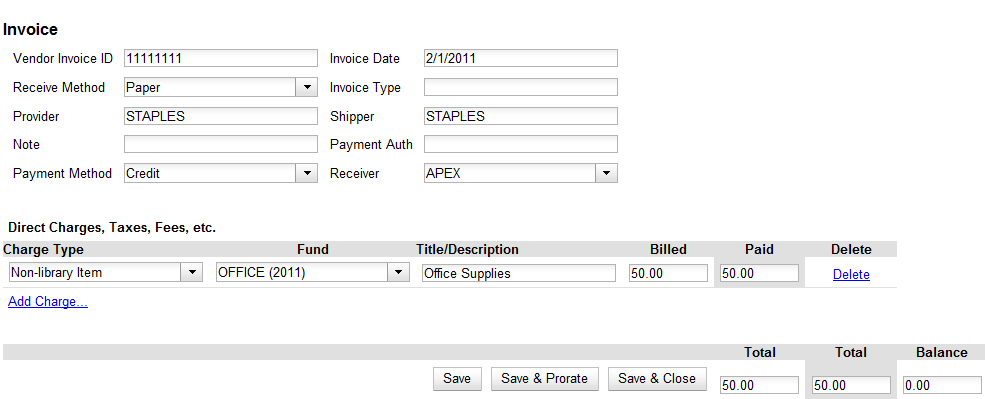
Creating a blanket invoice
You can create a blanket invoice for purchases that are not attached to a purchase order.
-
Click Acquisitions → Create invoice.
-
Enter the invoice information in the top half of the screen.
-
To add charges for materials not attached to a purchase order, click Add
Charge… This functionality may also be used to add shipping, tax, and other fees.
Select a charge type from the drop-down menu.
Note
New charge types can be added via Administration → Acquisitions
Administration → Invoice Item Types.
-
Select a fund from the drop-down menu.
-
Enter a Title/Description of the resource.
-
Enter the amount that you were billed.
-
Enter the amount that you paid.
-
Save the invoice.
Adding line items from a Purchase Order or search results screen to an invoice
You can create an invoice or add line items to an invoice directly from a
Purchase Order or an acquisitions search results screen.
-
Place a checkmark in the box for selected line items from the Purchase Order' or acquisitions search results page.
-
If you are creating a new invoice, click Actions → Create Invoice From
Selected Line Items. Enter the invoice information in the top half of the
screen.
-
If you are adding the line items to an existing invoice, click Actions →
Link Selected Line Items to Invoice. Enter the Invoice # and Provider and
then click the Link button.
-
Evergreen automatically enters the number of items that was ordered in
the # Invoiced and # Paid fields. Adjust these quantities as needed.
-
Enter the amount that the organization was billed. This entry will
automatically propagate to the Paid field.
-
You have the option to add charge types if applicable. Charge types are
additional charges that can be selected from the drop-down menu. Common charge
types include taxes and handling fees.
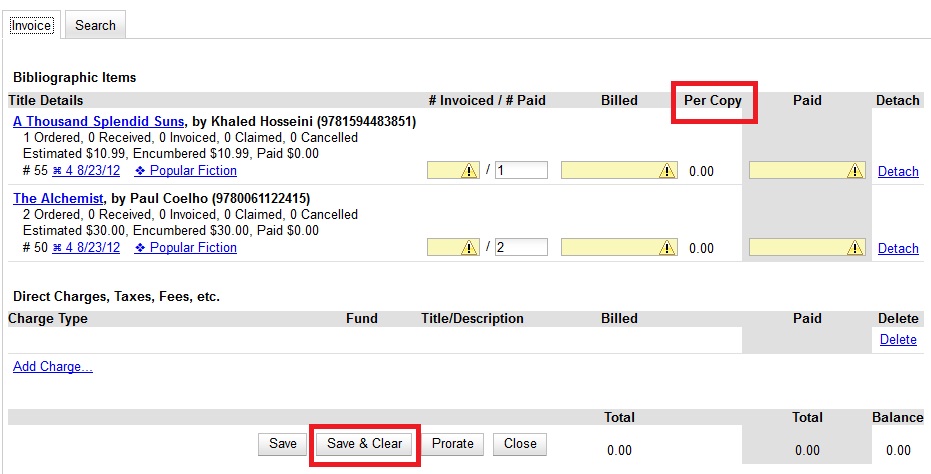
You have four options for saving an invoice.
-
Click Save to save the changes you have made while staying in the current
invoice.
-
Click Save & Clear to save the changes you have made and to replace the
current invoice with a new invoice so that you can continue invoicing items.
-
Click Prorate to save the invoice and prorate any additional charges, such
as taxes, across funds, if multiple funds have been used to pay the invoice.
Note
Prorating will only be applied to charge types that have the Prorate? flag set
to true. This setting can be adjusted via Administration →
Acquisitions Administration → Invoice Item Types.
-
Click Close. Choose this option when you have completed the invoice. This
option will also save any changes that have been made. Funds will be disencumbered when the invoice is closed.
-
You can re-open a closed invoice by clicking the link, Re-open invoice. This
link appears at the bottom of a closed invoice.
Search for line items from an invoice
You can open an invoice, search for line items from
the invoice, and add your search results to a new or existing invoice. This
feature is especially useful when you want to populate an invoice with line
items from multiple purchase orders.
In this example, we’ll add line items to a new invoice:
-
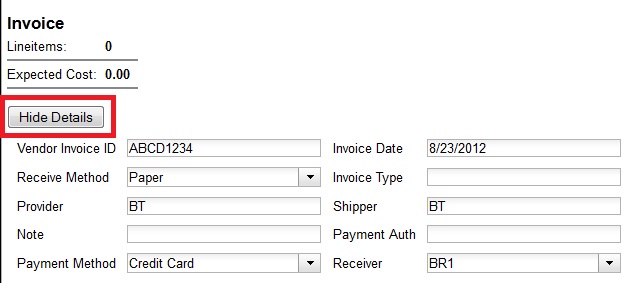
Click Acquisitions → Create Invoice.
-
An invoice summary appears at the top of the invoice and includes the number
of line items on the invoice and the expected cost of the items. This number
will change as we add line items to the invoice.
Enter the invoice details (optional). If you do not enter the invoice
details, then Evergreen will populate the Provider and Receiver fields with
information from the line items.
Note
If you do not want to display the details, click Hide Details.
-
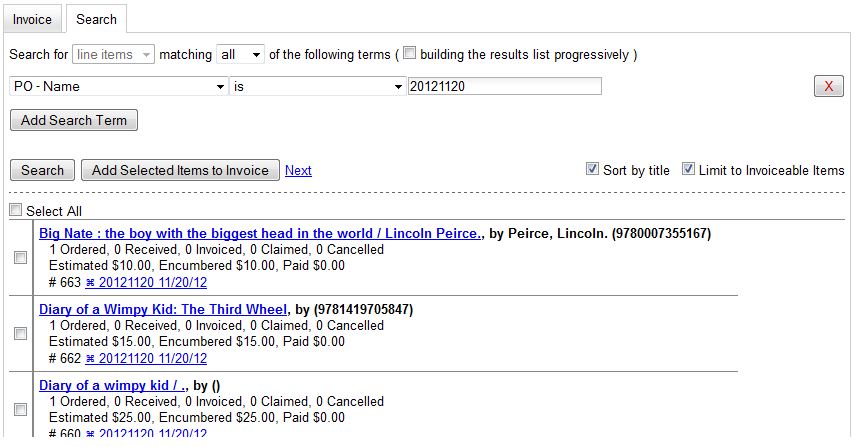
Click the Search tab to add line items to an invoice.
-
Select your search criteria from the drop-down menu.
-
On the right side of the screen, Limit to Invoiceable Items is checked by
default. Invoiceable items are those that are on order, have not been
cancelled, and have not yet been invoiced. Evergreen also filters out items
that have already been added to an invoice. Finally, if this box is checked,
and if your entered the invoice details at the top of the screen, then Evergreen
will filter your search for items that have the same provider as the one that
you entered. If you have not entered the invoice details, then Evergreen
removes this limit.
-
Sort by title (optional). By default, results are listed by line item
number. Check this box to sort by ascending title.
-
Building the results list progressively (optional). By default, new search
results will replace previous results on the screen. Check this box for the
search results list to build with each subsequent search. This option is useful
for libraries that might search for line items by scanning an ISBN. Several
ISBNs can be scanned and then the entire result set can be selected and moved
to the invoice in a batch.
Click Search.
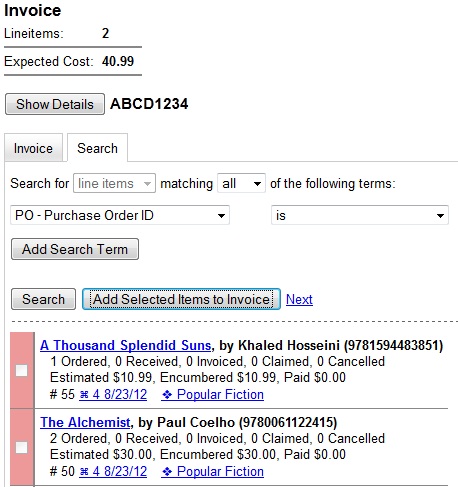
Use the Next button to page through results, or select a line item(s), and
click Add Selected Items to Invoice.
.The rows that you selected are highlighted, and the invoice summary at the
top of the screen updates.
-
Click the Invoice tab to see the updated invoice.
-
Evergreen automatically enters the number of items that was ordered in the
# Invoiced and # Paid fields. Adjust these quantities as needed.
-
Enter the amount that the organization was billed. This entry will
automatically propagate to the Paid field. The Per Copy field calculates the
cost of each copy by dividing the amount that was billed by the number of
copies for which the library paid.
Create an invoice for a purchase order
You can create an invoice for all of the line items on a purchase order. With
the exception of fields with drop-down menus, no limitations on the data that you enter exist.
-
Open a purchase order.
-
Click Create Invoice.
-
Enter a Vendor Invoice ID. This number may be listed on the paper invoice
sent from your vendor.
-
Choose a Receive Method from the drop-down menu. The system will default to
Paper.
-
The Provider is generated from the purchase order and is entered by default.
-
Enter a note (optional).
-
Select a payment method from the drop-down menu (optional).
-
The Invoice Date is entered by default as the date that you create the
invoice. You can change the date by clicking in the field. A calendar drops
down.
-
Enter an Invoice Type (optional).
-
The Shipper defaults to the provider that was entered in the purchase order.
-
Enter a Payment Authorization (optional).
The Receiver defaults to the branch at which your workstation is registered.
You can change the receiver by selecting an org unit from the drop-down menu.
Note
The bibliographic line items are listed in the next section of the invoice.
Along with the title and author of the line items is a summary of copies
ordered, received, invoiced, claimed, and cancelled. You can also view the
amounts estimated, encumbered, and paid for each line item. Finally, each
line item has a line item ID and links to the selection list (if used) and
the purchase order.
-
Evergreen automatically enters the number of items that was ordered in the
# Invoiced and # Paid fields. Adjust these quantities as needed.
-
Enter the amount that the organization was billed. This entry will
automatically propagate to the Paid field. The Per Copy field calculates the
cost of each copy by dividing the amount that was billed by the number of
copies for which the library paid.
-
You have the option to add charge types if applicable. Charge types are
additional charges that can be selected from the drop-down menu. Common charge
types include taxes and handling fees.
You have four options for saving an invoice.
-
Click Save to save the changes you have made while staying in the current
invoice.
-
Click Save & Clear to save the changes you have made and to replace the
current invoice with a new invoice so that you can continue invoicing items.
-
Click Prorate to save the invoice and prorate any additional charges, such
as taxes, across funds, if multiple funds have been used to pay the invoice.
Note
Prorating will only be applied to charge types that have the Prorate? flag set
to true. This setting can be adjusted via Administration →
Acquisitions Administration → Invoice Item Types.
-
Click Close. Choose this option when you have completed the invoice. This
option will also save any changes that have been made. Funds will be disencumbered when the invoice is closed.
-
You can re-open a closed invoice by clicking the link, Re-open invoice. This
link appears at the bottom of a closed invoice.
Link an existing invoice to a purchase order
You can use the link invoice feature to link an existing invoice to a purchase
order. For example, an invoice is received for a shipment with items on
purchase order #1 and purchase order #2. When the invoice arrives, purchase
order #1 is retrieved, and the invoice is created. To receive the items on
purchase order #2, simply link the invoice to the purchase order. You do not
need to recreate it.
-
Open a purchase order.
-
Click Link Invoice.
-
Enter the Invoice # and the Provider of the invoice to which you wish to link.
-
Click Link.