User Buckets allow staff to batch delete and make batch modifications to user accounts in Evergreen. Batch modifications can be made to selected fields in the patron account:
-
Home Library
-
Profile Group
-
Network Access Level
-
Barred flag
-
Active flag
-
Juvenile flag
-
Privilege Expiration Date
-
Statistical Categories
Batch modifications and deletions can be rolled back or reversed, with the exception of batch changes to statistical categories. Batch changes made in User Buckets will not activate any Action/Trigger event definitions that would normally be activated when editing an individual account.
User accounts can be added to User Buckets by scanning individual user barcodes or by uploading a file of user barcodes directly in the User Bucket interface. They can also be added to a User Bucket from the Patron Search screen. Batch changes and batch edit sets are tied to the User Bucket itself, not to the login of the bucket owner.
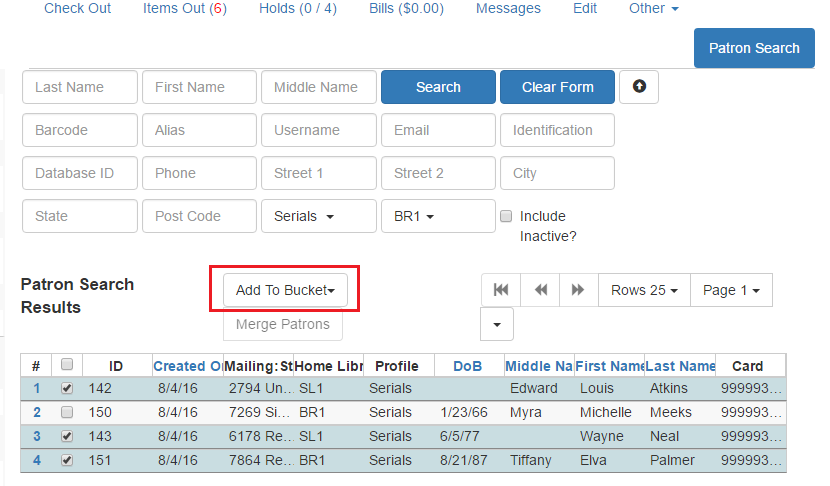
To add users to a bucket via the Patron Search screen:
-
Go to Search→Search for Patrons.
-
Enter your search and select the users you want to add to the user bucket by checking the box next to each user row. You can also hold down the CTRL or SHIFT on your keyboard and select multiple users.
Click Add to Bucket and select an existing bucket from the drop down menu or click New Bucket to create a new user bucket.
-
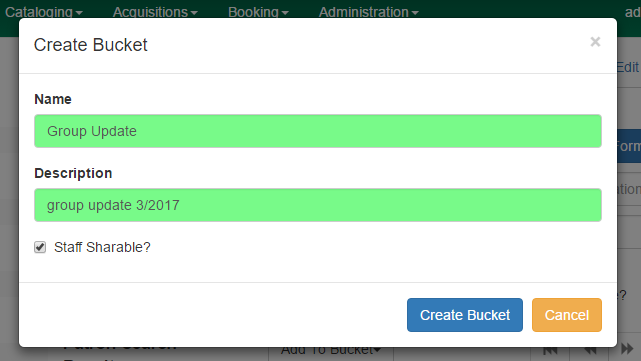
If creating a new user bucket, a dialog box called Create Bucket will appear where you can enter a bucket Name and Description and indicate if the bucket is Staff Shareable?. Click Create Bucket.
-
After adding users to a bucket, an update will appear at the bottom-right hand corner of the screen that says "Successfully added # users to bucket [Name]".
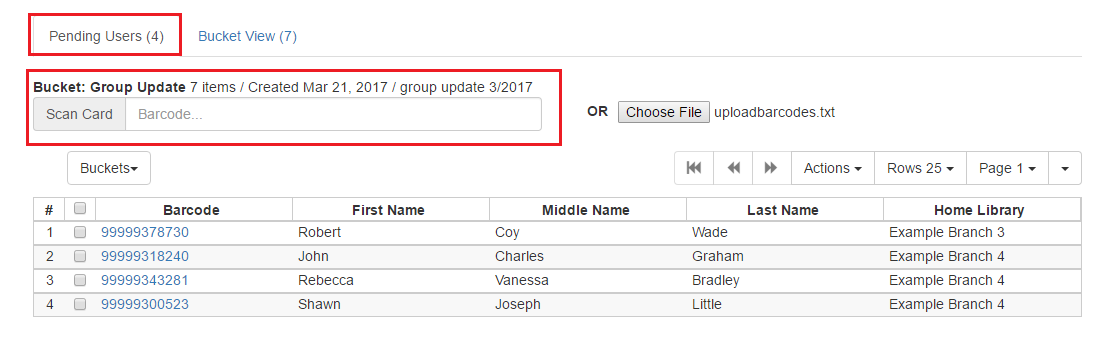
To add users to a bucket by scanning user barcodes in the User Bucket interface:
-
Go to Circulation→User Buckets and select the Pending Users tab at the top of the screen.
Click on Buckets and select an existing bucket from the drop down menu or click New Bucket to create a new user bucket.
-
If creating a new user bucket, a dialog box called Create Bucket will appear where you can enter a bucket Name and Description and indicate if the bucket is Staff Shareable?. Click Create Bucket.
-
After selecting or creating a bucket, the Name, Description, number of items, and creation date of the bucket will appear above the Scan Card field.
-
Scan in the barcodes of the users that you want to add to the selected bucket into the Scan Card field. Each user account will be added to the Pending Users tab. Hit ENTER on your keyboard after manually typing in a barcode to add it to the list of Pending Users.
-
Select the user accounts that you want to add to the bucket by checking the box next to each user row or by using the CTRL or SHIFT key on your keyboard to select multiple users.
-
Go to Actions→Add To Bucket or right-click on a selected user account to view the Actions menu and select Add To Bucket. The user accounts will move to the Bucket View tab and are now in the selected User Bucket.
To add users to a bucket by uploading a file of user barcodes:
-
Go to Circulation→User Buckets and select the Pending Users tab at the top of the screen.
Click on Buckets and select an existing bucket from the drop down menu or click New Bucket to create a new user bucket.
-
If creating a new user bucket, a dialog box called Create Bucket will appear where you can enter a bucket Name and Description and indicate if the bucket is Staff Shareable?. Click Create Bucket.
-
After selecting or creating a bucket, the Name, Description, number of items, and creation date of the bucket will appear above the Scan Card field.
In the Pending Users tab, click Choose File and select the file of barcodes to be uploaded.
-
The file that is uploaded must be a .txt file that contains a single barcode per row.
-
The user accounts will automatically appear in the list of Pending Users.
-
Select the user accounts that you want to add to the bucket by checking the box next to each user row or by using the CTRL or SHIFT key on your keyboard to select multiple users.
-
Go to Actions→Add To Bucket or right-click on a selected user account to view the Actions menu and select Add To Bucket. The user accounts will move to the Bucket View tab and are now in the selected User Bucket.
To batch edit all users in a user bucket:
-
Go to Circulation→User Buckets and select the Bucket View tab.
Click Buckets and select the bucket you want to modify from the list of existing buckets.
-
After selecting a bucket, the Name, Description, number of items, and creation date of the bucket will appear at the top of the screen.
-
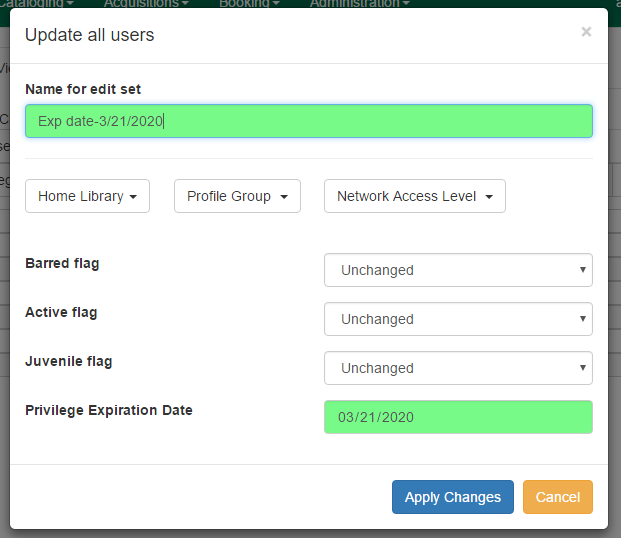
Verify the list of users in the bucket and click Batch edit all users. A dialog box called Update all users will appear where you can select the batch modifications to be made to the user accounts.
-
Assign a Name for edit set. This name will allow staff to identify the batch edit for future verification or rollbacks.
Set the values that you want to modify. The following fields can be modified in batch:
-
Home Library
-
Profile Group
-
Network Access Level
-
Barred flag
-
Active flag
-
Juvenile flag
-
Privilege Expiration Date
-
Click Apply Changes. The modification(s) will be applied in batch.
Batch Modify Statistical Categories
To batch modify statistical categories for all users in a bucket:
-
Go to Circulation→User Buckets and select the Bucket View tab.
Click Buckets and select the bucket you want to modify from the list of existing buckets.
-
After selecting a bucket, the Name, Description, number of items, and creation date of the bucket will appear at the top of the screen.
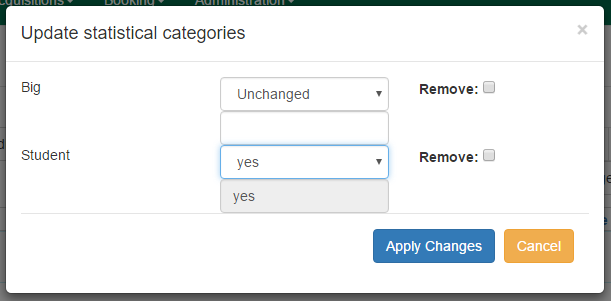
Verify the list of users in the bucket and click Batch modify statistical categories. A dialog box called Update statistical categories will appear where you can select the batch modifications to be made to the user accounts. The existing patron statistical categories will be listed and staff can choose:
-
To leave the stat cat value unchanged in the patron accounts.
-
To select a new stat cat value for the patron accounts.
-
Check the box next to Remove to delete the current stat cat value from the patron accounts.
-
Click Apply Changes. The stat cat modification(s) will be applied in batch.
To batch delete users in a bucket:
. Go to Circulation→User Buckets and select the Bucket View tab.
. Click on Buckets and select the bucket you want to modify from the list of existing buckets.
.. After selecting a bucket, the Name, Description, number of items, and creation date of the bucket will appear at the top of the screen.
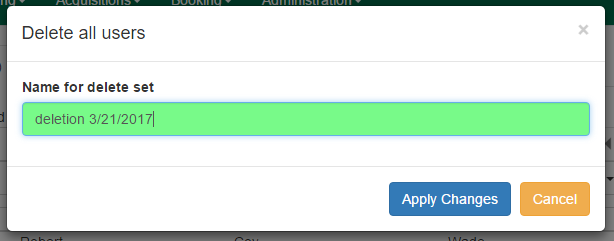
. Verify the list of users in the bucket and click Delete all users. A dialog box called Delete all users will appear.
. Assign a Name for delete set. This name will allow staff to identify the batch deletion for future verification or rollbacks.
. Click Apply Changes. All users in the bucket will be marked as deleted.
Note
Batch deleting patrons from a user bucket does not use the Purge User functionality, but instead marks the users as deleted.
-
The batch changes that have been made to User Buckets can be viewed by going to Circulation→User Buckets and selecting the Bucket View tab.
-
Click Buckets to select an existing bucket.
-
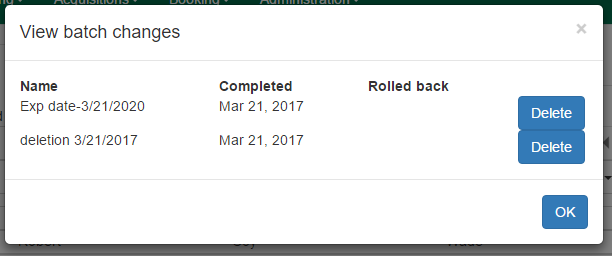
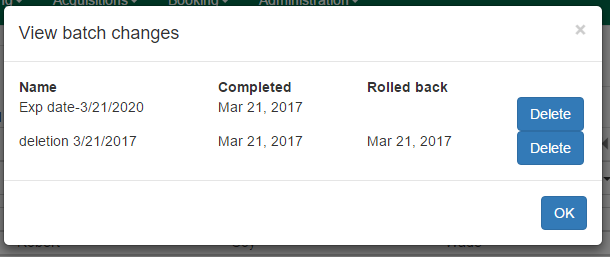
Click View batch changes. A dialog box will appear that lists the Name, date Completed, and date Rolled back of any batch changes made to the bucket. There is also an option to Delete a batch change. This will remove this batch change from the list of actions that can be rolled back. It will not delete or reverse the batch change.
-
Click OK to close the dialog box.
-
Batch Changes and Batch Deletions can be rolled back or reversed by going to Circulation→User Buckets and selecting the Bucket View tab.
-
Click Buckets to select an existing bucket.
-
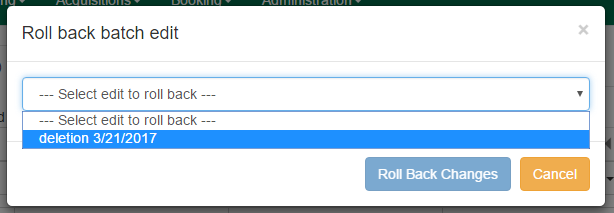
Click Roll back batch edit. A dialog box will appear that contains a drop down menu that lists all batch edits that can be rolled back. Select the batch edit to roll back and click Roll Back Changes. The batch change will be reversed and the roll back is recorded under View batch changes.
Note
Batch statistical category changes cannot be rolled back.
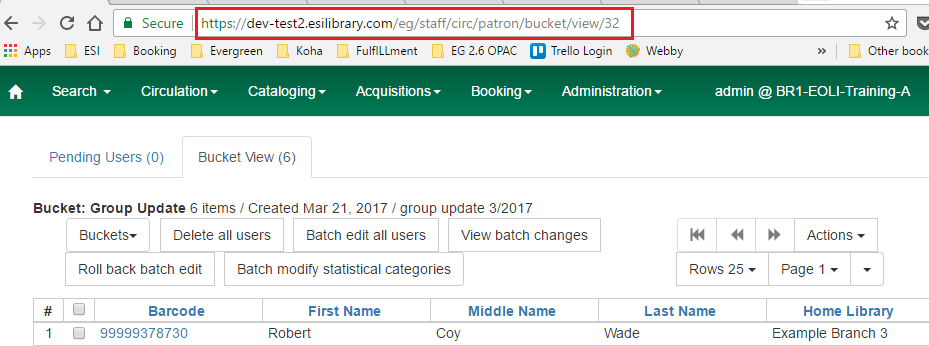
If a User Bucket has been made Staff Shareable, it can be retrieved via bucket ID by another staff account. The ID for each bucket can be found at the end of the URL for the bucket. For example, in the screenshot below, the bucket ID is 32.
A shared bucket can be retrieved by going to Circulation→User Buckets and selecting the Bucket View tab. Next, click Buckets and select Shared Bucket. A dialog box called Load Shared Bucket by Bucket ID will appear. Enter the ID of the bucket you wish to retrieve and click Load Bucket. The shared bucket will load in the Bucket View tab.
All permissions must be granted at the organizational unit that the workstation is registered to or higher and are checked against the users' Home Library at when a batch modification or deletion is executed.
Permissions for Batch Edits:
-
To batch edit a user bucket, staff accounts must have the VIEW_USER, UPDATE_USER, and CONTAINER_BATCH_UPDATE permissions for all users in the bucket.
-
To make a batch changes to Profile Group, staff accounts must have the appropriate group application permissions for the profile groups.
-
To make batch changes to the Home Library, staff accounts must have the UPDATE_USER permission at both the old and new Home Library.
-
To make batch changes to the Barred Flag, staff accounts must have the appropriate BAR_PATRON or UNBAR_PATRON permission.
Permissions for Batch Deletion:
-
To batch delete users in a user bucket, staff accounts must have the UPDATE_USER and DELETE_USER permissions for all users in the bucket.