Funds allow you to allocate credits toward specific purchases. In the funds
interface, you can create funds; allocate credits from funding sources to funds;
transfer money between funds; and apply fund tags to funds. Funds are created
for a specific year, either fiscal or calendar. These funds are owned by org
units. At the top of the funds interface, you can set a contextual org unit and
year. The drop-down menu at the top of the screen enables you to focus on funds
that are owned by specific organizational units during specific years.
-
To create a new fund, click Administration → Acquisitions Administration → Funds.
-
Enter a name for the fund. No limits exist on the number of characters that
can be entered in this field.
-
Create a code for the fund. No limits exist on the number of characters that
can be entered in this field.
-
Enter a year for the fund. This can be a fiscal year or a calendar year. The
format of the year is YYYY.
Select an org unit from the drop-down menu. The org unit indicates the
organizational units whose staff can use this fund. This menu is populated with
the shortnames that you created for your libraries in the organizational units
tree (See Administration → Server Administration → Organizational Units).
Note
The rule of parental inheritance applies to this list. See section
-
Select a currency type from the drop-down menu. This menu is comprised of
entries in the currency types menu. When a fund is applied to a line item or
copy, the price of the item will be encumbered in the currency associated with
the fund.
-
Click the Active box to activate this fund. You cannot make purchases from
this fund if it is not active.
-
Enter a Balance Stop Percent. The balance stop percent prevents you from
making purchases when only a specified amount of the fund remains. For example,
if you want to spend 95 percent of your funds, leaving a five percent balance in
the fund, then you would enter 95 in the field. When the fund reaches its
balance stop percent, it will appear in red when you apply funds to copies.
-
Enter a Balance Warning Percent. The balance warning percent gives you a
warning that the fund is low. You can specify any percent. For example, if you
want to spend 90 percent of your funds and be warned when the fund has only 10
percent of its balance remaining, then enter 90 in the field. When the fund
reaches its balance warning percent, it will appear in yellow when you apply
funds to copies.
-
Check the Propagate box to propagate funds. When you propagate a fund, the ILS
will create a new fund for the following fiscal year with the same parameters
as your current fund. All of the settings transfer except for the year and the
amount of money in the fund. Propagation occurs during the fiscal year close-out
operation.
-
Check the Rollover box if you want to roll over remaining funds into the same
fund next year. You should also check this box if you only want to roll over
encumbrances into next year’s fund.
-
Click Save.
Allocate credits from funding sources to funds
Credits can be applied to funds from funding sources using the fund interface.
The credits that you apply to the fund can be applied later to purchases.
-
To access funds, click Administration → Acquisitions Administration → Funds.
-
Click the hyperlinked name of the fund.
-
To add a credit to the fund, click the Create Allocation tab.
-
Choose a Funding Source from the drop-down menu.
-
Enter an amount that you want to apply to the fund from the funding source.
-
Enter a note. This field is optional.
-
Click Apply.
Transfer credits between funds
The credits that you allocate to funds can be transferred between funds if
desired. In the following example, you can transfer $500.00 from the Young Adult
Fiction fund to the Children’s DVD fund.
-
To access funds, click Administration → Acquisitions Administration → Funds.
-
Click the hyperlinked name of the originating fund.
-
The Fund Details screen appears. Click Transfer Money.
-
Enter the amount that you would like to transfer.
-
From the drop-down menu, select the destination fund.
-
Add a note. This field is optional.
-
Click Transfer.
Track balances and expenditures
The Fund Details allows you to track the fund’s balance, encumbrances, and
amount spent. It also allows you to track allocations from the funding
source(s), debits, and fund tags.
-
To access the fund details, click on the hyperlinked name of the fund that you
created.
-
The Summary allows you to track the following:
-
Balance - The balance is calculated by subtracting both items that have been
invoiced and encumbrances from the total allocated to the fund.
-
Total Allocated - This amount is the total amount allocated from the Funding
Source.
-
Spent Balance - This balance is calculated by subtracting only the items that
have been invoiced from the total allocated to the fund. It does not include
encumbrances.
-
Total Debits - The total debits are calculated by adding the cost of items
that have been invoiced and encumbrances.
-
Total Spent - The total spent is calculated by adding the cost of items that
have been invoiced. It does not include encumbrances.
-
Total Encumbered - The total encumbered is calculated by adding all
encumbrances.
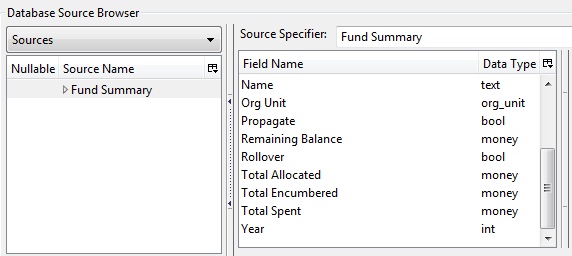
A core source, Fund Summary, is available in the reports interface. This
core source enables librarians to easily run a report on fund activity. Fields
that are accessible in this interface include Remaining Balance, Total
Allocated, Total Encumbered, and Total Spent.
Edit a fund just as you would edit a currency type.
Perform fiscal year close-out operation
The Fiscal Year Close-Out Operation allows you to deactivate funds for the
current year and create analogous funds for the next year. It transfers
encumbrances to the analogous funds, and it rolls over any remaining funds if
you checked the rollover box when creating the fund.
-
To access the year end closeout of a fund, click Administration → Server
Administration → Acquisitions → Funds.
-
Click Fund Propagation and Rollover.
-
Check the box adjacent to Perform Fiscal Year Close-Out Operation.
For funds that have the "Rollover" setting enabled, if you want to move the
fund’s encumbrances to the next year without moving unspent money, check the
box adjacent to Limit Fiscal Year Close-out Operation to Encumbrances.
Note
The Limit Fiscal Year Close-out Operation to Encumbrances will only display
if the Allow funds to be rolled over without bringing the money along Library
Setting has been enabled. This setting is available in the Library Setting
Editor accessible via Administration → Local Administration → Library
Settings Editor.
-
Notice that the context org unit reflects the context org unit that you
selected at the top of the Funds screen.
-
If you want to perform the close-out operation on the context org unit and its
child units, then check the box adjacent to Include Funds for Descendant Org
Units.
-
Check the box adjacent to dry run if you want to test changes to the funds
before they are enacted. Evergreen will generate a summary of the changes that
would occur during the selected operations. No data will be changed.
-
Click Process.
-
Evergreen will begin the propagation process. Evergreen will make a clone of
each fund, but it will increment the year by 1.