| HomePrev | Chapter 131. Circulation | Next |
|---|
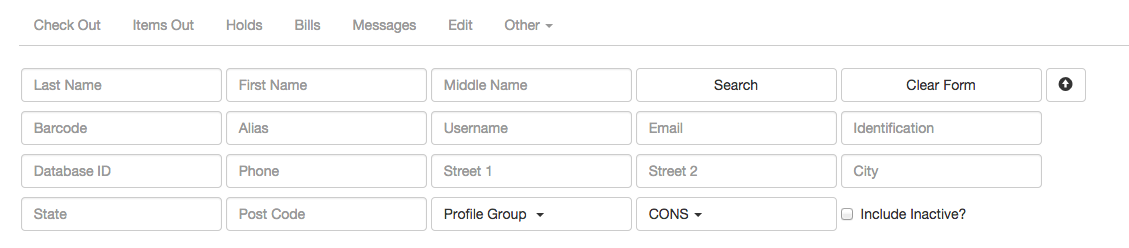
To search for a patron, select Search → Search for Patrons from the menu bar.
The Patron Search screen will display. It will contain options to search on the following fields:

Next to the Clear Form button there is a button with an arrow pointing down that will display the following additional search fields:
You patrons searches may also include patrons marked “inactive” if you click on the Include Inactive? checkbox.
Once you have located the desired patron, click on the entry row for this patron in the results screen. A summary for this patron will display on the left hand side.
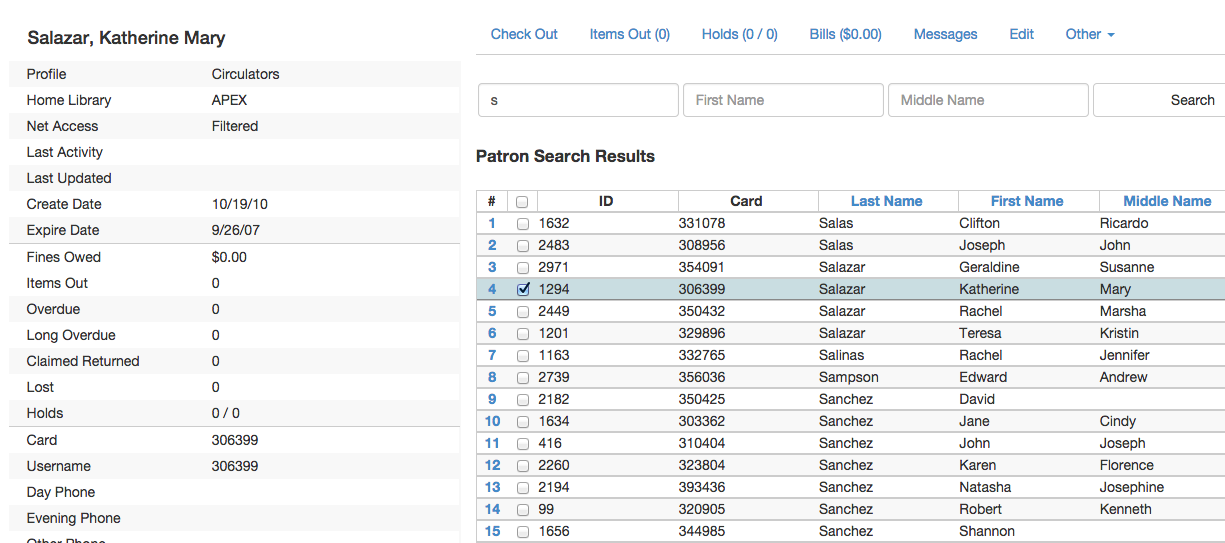
The Patron Search button on the upper right may be used to resume searching for patrons.
To register a new patron, select Circulation → Register Patron from the menu bar. The Patron Registration form will display.
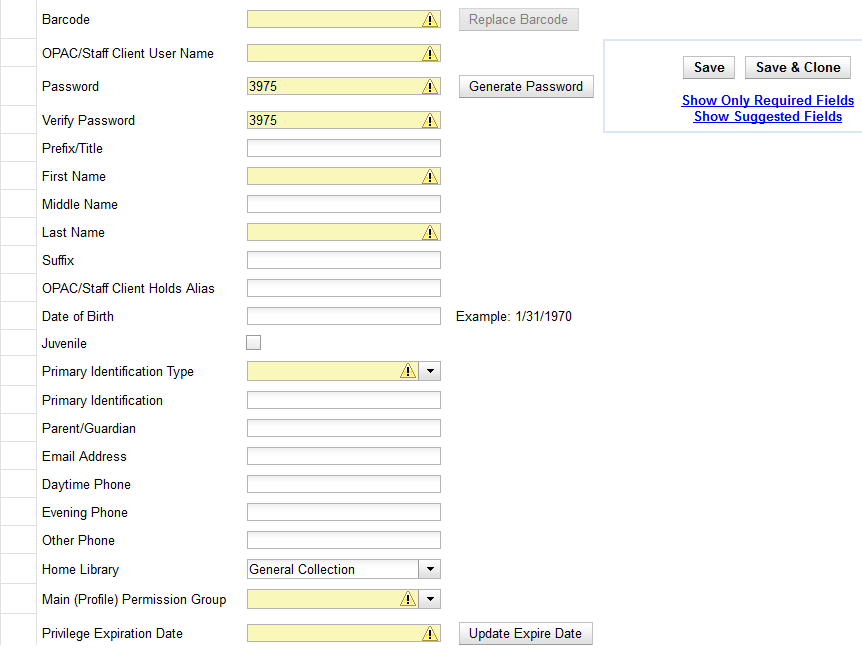
Mandatory fields display in yellow.

The Show Only Required Fields and Show Suggested Fields may be used to limit the options on this page.
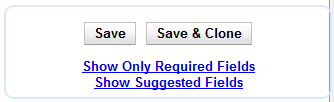
When one of these options is selected, it is possible switch to the other limited view or to revert to the original view by selecting Show All Fields.
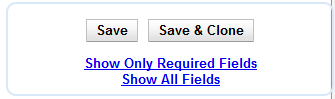
When finished entering the necessary information, select Save to save the new patron record or Save & Clone to register a patron with the same address. When Save & Clone is selected, the address information is copied into the resulting patron registration screen. It is linked to the original patron. Address information may only be edited through the original record.
Abstract
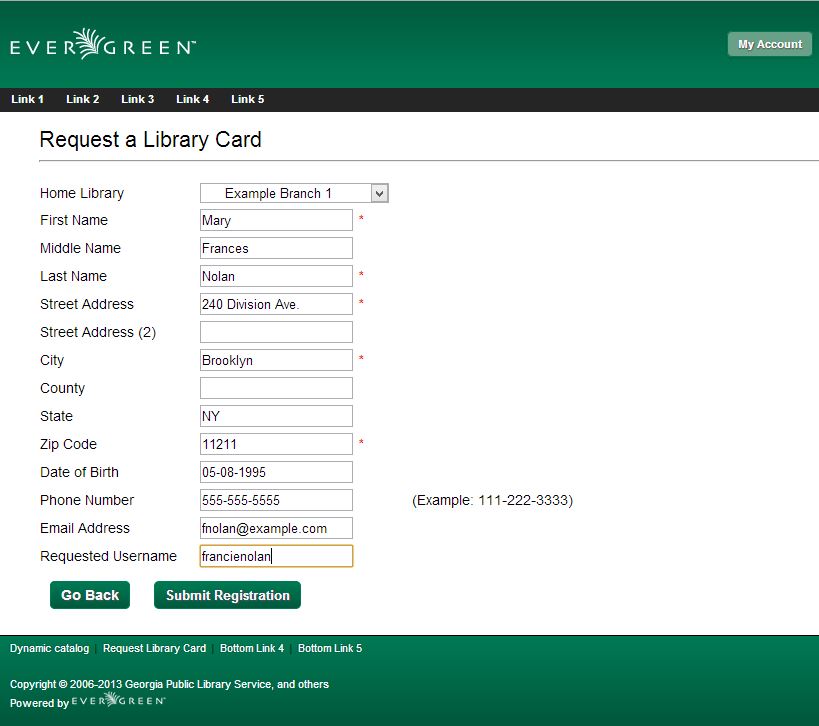
Patron Self-Registration allows patrons to initiate registration for a library account through the OPAC. Patrons can fill out a web-based form with basic information that will be stored as a “pending patron” in Evergreen. Library staff can review pending patrons in the staff-client and use the pre-loaded account information to create a full patron account. Pending patron accounts that are not approved within a configurable amount of time will be automatically deleted.
Patron Self-Registration
Managing Pending Patrons
Retrieve the patron record as described in the section Searching Patrons.
Click on Edit from the options that display at the top of the patron record.
Edit information as required. When finished, select Save.
After selecting Save, the page will refresh. The edited information will be reflected in the patron summary pane.
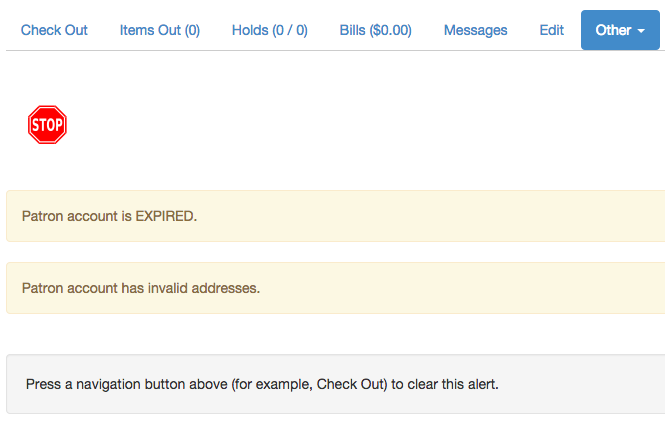
Expired patron accounts when initially retrieved – an alert stating that the “Patron account is EXPIRED.”
Open the patron record in edit mode as described in the section Updating Patron Information.
Navigate to the information field labeled Privilege Expiration Date. Enter a new date in this box. When you place your cursor in the Patron Expiration Date box, a calendar widget will display to help you easily navigate to the desired date.
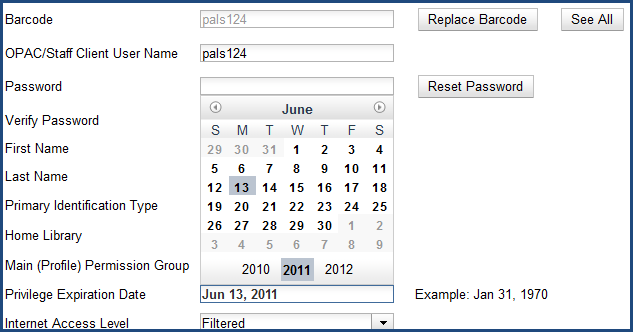
Select the date using the calendar widget or key the date in manually. Click the Save button. The screen will refresh and the “expired” alerts on the account will be removed.
Retrieve the patron record as described in the section Searching Patrons.
Open the patron record in edit mode as described in the section Updating Patron Information.
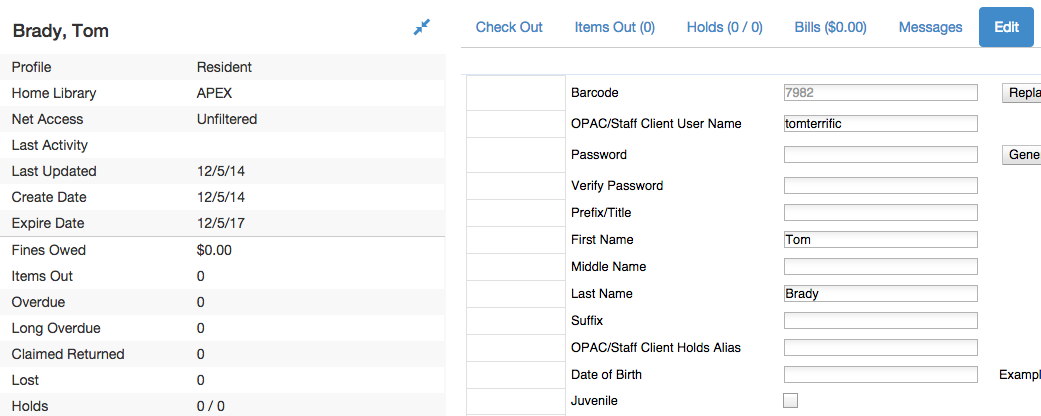
Next to the Barcode field, select the Replace Barcode button.

This will clear the barcode field. Enter a new barcode and Save the record. The screen will refresh and the new barcode will display in the patron summary pane.
If a patron’s barcode is mistakenly replaced, the old barcode may be reinstated. Retrieve the patron record as described in the section Searching Patrons. Open the patron record in edit mode as described in the section Updating Patron Information.
Select the See All button next to the Replace Barcode button. This will display the current and past barcodes associated with this account.
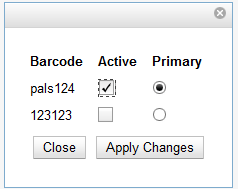
Check the box(es) for all barcodes that should be “active” for the patron. An “active” barcode may be used for circulation transactions. A patron may have more than one “active” barcode. Only one barcode may be designated “primary.” The “primary” barcode displays in the patron’s summary information in the Library Card field.
Once you have modified the patron barcode(s), Save the patron record. If you modified the “primary” barcode, the new primary barcode will display in the patron summary screen.
A patron’s password may be reset from the OPAC or through the staff client. To reset the password from the staff client, retrieve the patron record as described in the section Searching Patrons.
Open the patron record in edit mode as described in the section Updating Patron Information.
Select the Reset Password button next to the Password field.

The existing password is not displayed in patron records for security reasons.
A new number will populate the Password and Verify Password text boxes. Make note of the new password and Save the patron record. The screen will refresh and the new password will be suppressed from view.
If you need to change a patron or staff account password without using the staff client, here is how you can reset it with SQL.
Connect to your Evergreen database using psql or similar tool, and retreive and verify your admin username:
psql -U <user-name> -h <hostname> -d <database>

SELECT id, usrname, passwd from actor.usr where usrname = 'admin';
If you do not remember the username that you set, search for it in the actor.usr table, and then reset the password.
UPDATE actor.usr SET passwd = <password> WHERE id=<id of row to be updated>;
The new password will automatically be hashed.
A patron may be barred from circulation activities. To bar a patron, retrieve the patron record as described in the section Searching Patrons.
Open the patron record in edit mode as described in the section Updating Patron Information.
Check the box for Barred in the patron account.
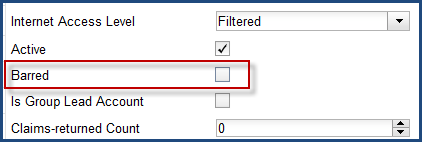
Save the user. The screen will refresh.
Barring a patron from one library bars that patron from all consortium member libraries.
To unbar a patron, uncheck the Barred checkbox.
Barred: Stops patrons from using their library cards; alerts the staff that the patron is banned/barred from the library. The “check-out” functionality is disabled for barred patrons (NO option to override – the checkout window is unusable and the bar must be removed from the account before the patron is able to checkout items). These patrons may still log in to the OPAC to view their accounts.
Blocked: Often, these are system-generated blocks on patron accounts.
Some examples:
A notice appears when a staff person tries to checkout an item to blocked patrons, but staff may be given permissions to override blocks.
There are several types of messages available for staff to leave notes on patron records.
Patron Notes: These notes are added via Other → Notes in the patron record. These notes can be viewable by staff only or shared with the patron. Staff initials can be required. (See the section Patron Notes for more.)
Patron Alerts: This type of alert is added via Edit button in the patron record. There is currently no way to require staff initials for this type of alert. (See the section Patron Alerts for more.)
Staff-Generated Penalties/Messages: These messages are added via the Messages button in the patron record. They can be a note, alert or block. Staff initials can be required. (See the section Staff-Generated Penalties/Messages for more.)
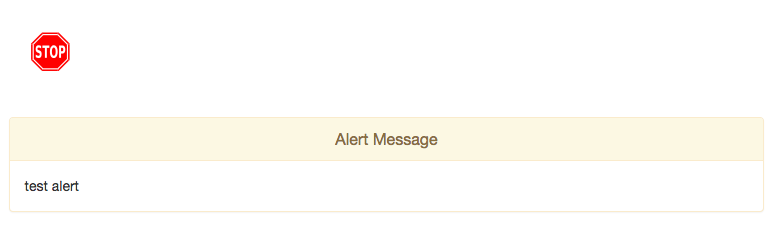
When an account has an alert on it, a Stop sign is displayed when the record is retrieved.
Navigating to an area of the patron record using the navigation buttons at the top of the record (for example, Edit or Bills) will clear the message from view.
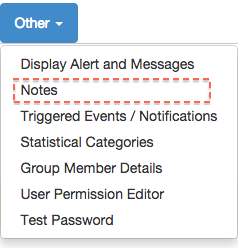
If you wish to view these alerts after they are cleared from view, they may be retrieved. Use the Other menu to select Display Alert and Messages.

There are two types of Patron Alerts:
System-generated alerts: Once the cause is resolved (e.g. patron’s account has been renewed), the message will disappear automatically.
Staff-generated alerts: Must be added and removed manually.
To add an alert to a patron account, retrieve the patron record as described in the section Searching Patrons.
Open the patron record in edit mode as described in the section Updating Patron Information.
Enter the alert text in the Alert Message field.
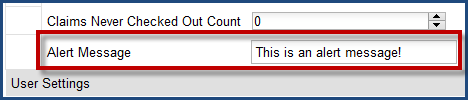
Save the record. The screen will refresh and the alert will display.
To remove the alert, retrieve the patron record as described in the section Searching Patrons.
Open the patron record in edit mode as described in the section Updating Patron Information.
Delete the alert text in the Alert Message field.
Save the record.
The screen will refresh and the indicators for the alert will be removed from the account.
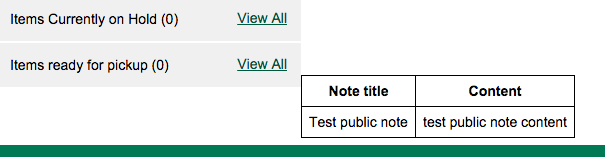
Notes are strictly communicative and may be made visible to the patron via their account on the OPAC. In the OPAC, these notes display on the account summary screen in the OPAC.
To insert or remove a note, retrieve the patron record as described in the section Searching Patrons.
Open the patron record in edit mode as described in the section Updating Patron Information.
Use the Other menu to navigate to Notes.
Select the Add New Note button. A Create a new note window displays.
To add a box in the Add Note window for staff initials and require their entry, see the "Require staff initials…" settings in the Library Settings Editor section.
Enter note information.
Select the check box for Patron Visible to display the note in the OPAC.
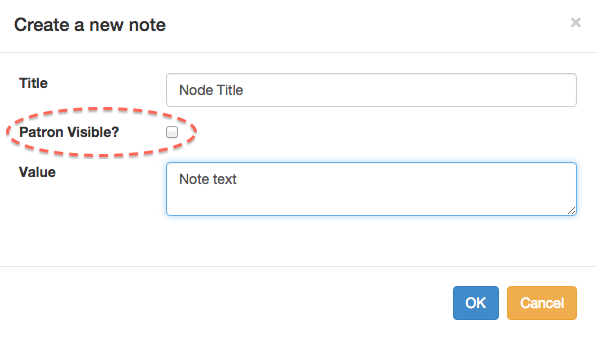
Select OK to save the note to the patron account.
To delete a note, go to Other → Notes and use the Delete button on the right of each note.

To access this feature, use the Messages button in the patron record.
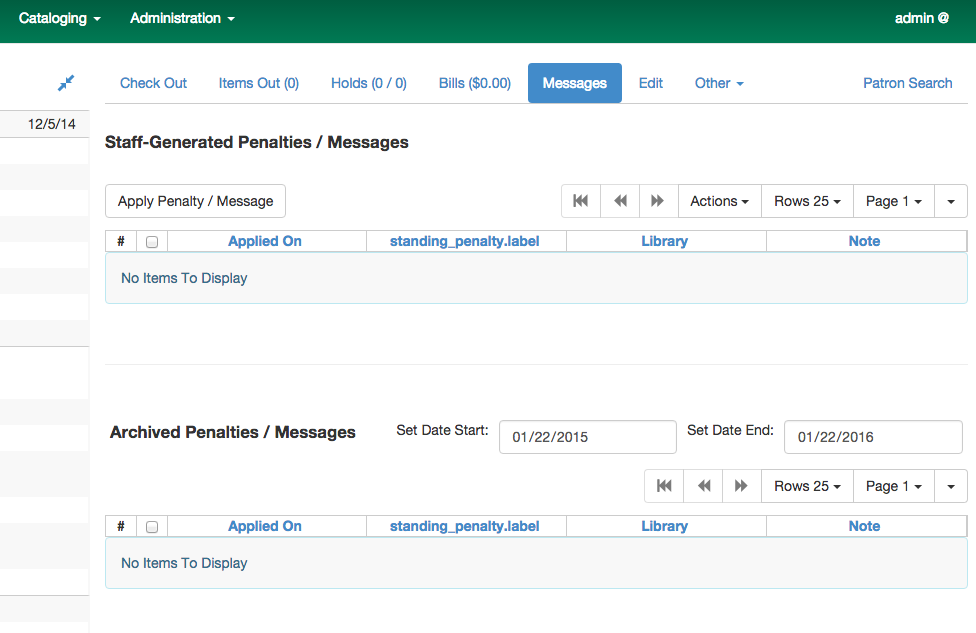
Click Apply Penalty/Message to begin the process of adding a message to the patron.
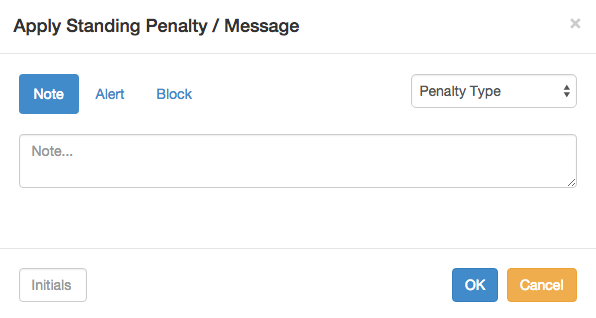
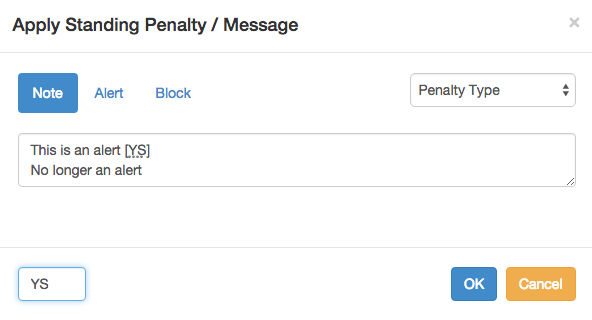
There are three options: Notes, Alerts, Blocks
After selecting the type of message to create, enter the message body into the box. If Staff Initials are required, they must be entered into the Initials box before the message can be added. Otherwise, fill in the optional Initials box and click OK
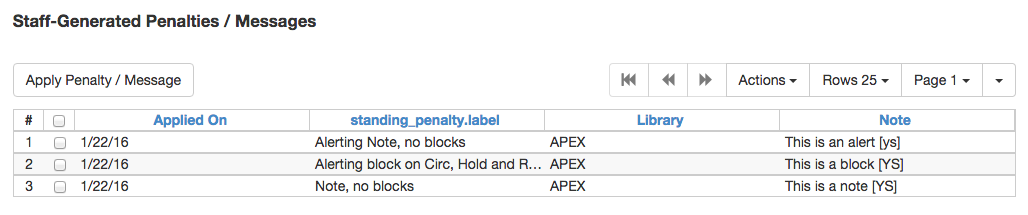
The message should now be visible in the Staff-Generated Penalties/Messages list. If a blocking or non-blocking alert, the message will also display immediately when the patron record is retrieved.
Messages can be edited by staff after they are created.
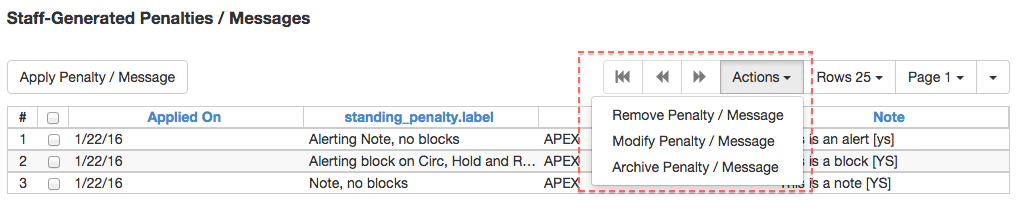
Click to select the message to be modified, then click Actions → Modify Penalty/Message. This menu can also be accessed by right-clicking in the message area.
To change the type of message, click on Note, Alert, Block to select the new type. Edit or add new text in the message body. Enter Staff Initials into the Initials box (may be required.) and click OK to submit the alterations.

Messages which are no longer current can be archived by staff. This action will remove any alerts or blocks associated with the message, but retains the information contained there for future reference.
Click to select the message to be archived, then click Actions → Archive Penalty/Message. This menu can also be accessed by right-clicking in the message area.

Archived messages will be shown in the section labelled Archived Penalties/Messages. To view messages, click Retrieve Archived Penalties. By default, messages archived within the past year will be retrieved. To retrieve messages from earlier dates, change the start date to the desired date before clicking Retrieve Archived Penalties.
Messages which are no longer current can be removed by staff. This action removes any alerts or blocks associated with the message and deletes the information from the system.
Click to select the message to be removed, then click Actions → Remove Penalty/Message. This menu can also be accessed by right-clicking in the message area.
To report a problem with this documentation or provide feedback, please contact the DIG mailing list.
© 2008-2015 GPLS and others. The Evergreen Project is a member of the Software Freedom Conservancy.
