| HomePrev | Part VI. System Administration From the Staff Client | Next |
|---|
Table of Contents
Staff with the required permissions (Circulator and above) can create bookable non-bibliographic resources such as laptops, projectors, and meeting rooms.
The following pieces make up a non-bibliographic resource:
You need to create resource types and resource attributes (features of the resource types), and add booking items (resources) to individual resource type. Each resource attribute may have multiple values. You need to link the applicable features (resource attributes and values) to individual item (resource) through the Resource Attribute Map. Before you create resources (booking items) you need to have a resource type and associated resource attributes and values, if any, for them.
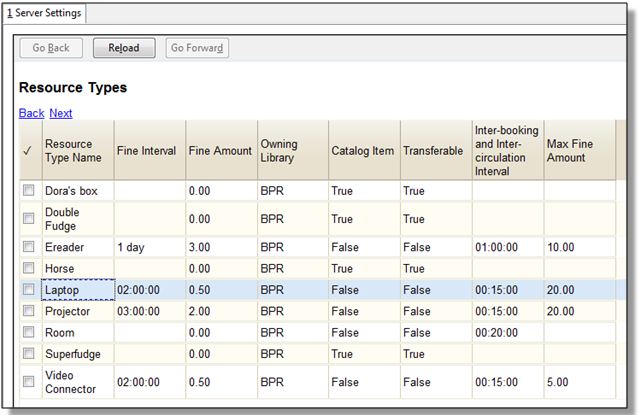
1) Select Administration → Booking Administration → Resource Types.

2) A list of current resource types will appear. Use Back and Next buttons to browse the whole list.
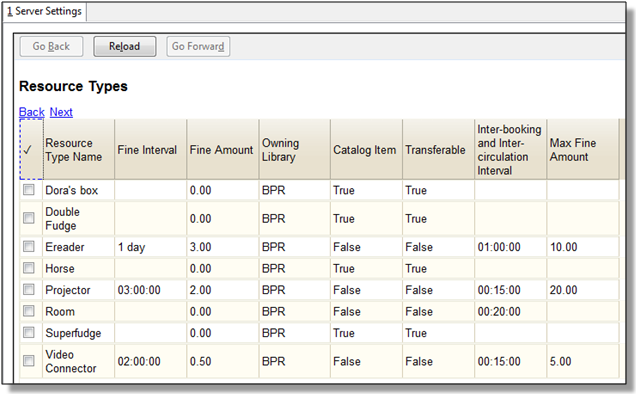
You may also see cataloged items in the list. Those items have been marked bookable or booked before.
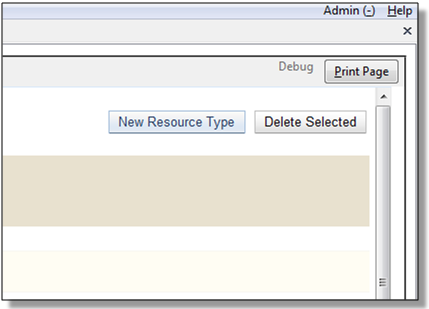
3) To create a new resource type, click New Resource Type in the top right corner, .
4) A box will appear in which you create your new type of resource.
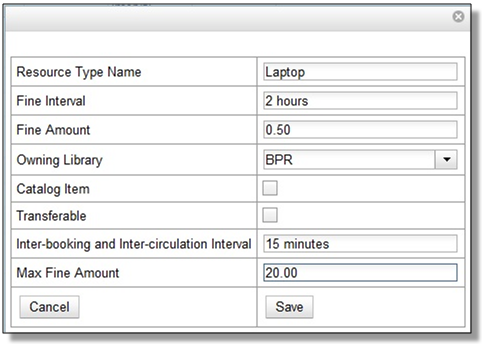
5) Click Save when you have entered the needed information.
6) The new resource type will appear in the list.
1) Select Administration → Booking Administration → Resource Attributes.
2) Click New Resource Attribute in the top right corner.
3) A box will appear in which you can add the attributes of the resource. Attributes are categories of descriptive information that are provided to the staff member when the booking request is made. For example, an attribute of a projector may be the type of projector. Other attributes might be the number of seats available in a room, or the computing platform of a laptop.
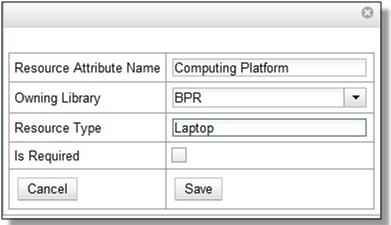
4) Click Save when the necessary information has been entered.
5) The added attribute will appear in the list.
One resource type may have multiple attributes. You may repeat the above procedure to add more.
1) One resource attribute may have multiple values. To add new attribute value, select Administration → Booking Administration → Resource Attribute Values.
2) Click New Resource Attribute Value in the top right corner.
3) A box will appear in which you assign a value to a particular attribute. Values can be numbers, words, or a combination of them, that describe the particular aspects of the resource that have been defined as Attributes. As all values appear on the same list for selection, values should be as unique as possible. For example, a laptop may have a computing platform that is either PC or Mac.
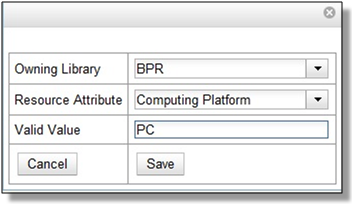
4) Click Save when the required information has been added.
5) The attribute value will appear in the list. Each attribute should have at least two values attached to it; repeat this process for all applicable attribute values.
1) Add items to a resource type. Click Administration → Booking Administration → Resources.
2) Click New Resource in the top right corner.
3) A box will appear. Add information for the resource.
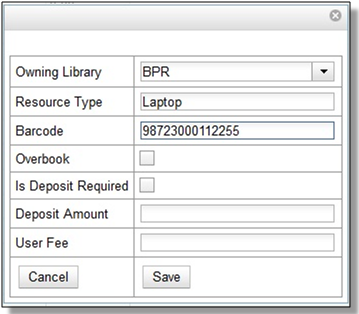
4) Click Save when the required information has been added.
5) The resource will appear in the list.
One resource type may have multiple resources attached.
1) Use Resource Attribute Maps to bring together the resources and their attributes and values. Select Administration → Booking Administration → Resource Attribute Maps.
2) Click New Resource Attribute Map in the right top corner.
3) A box will appear in which you will map your attributes and values to your resources.
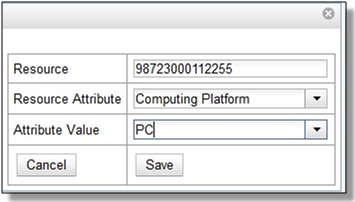
4) Click Save once you have entered the required information.
A resource may have multiple attributes and values. Repeat the above steps to map all.
5) The resource attribute map will appear in the list.
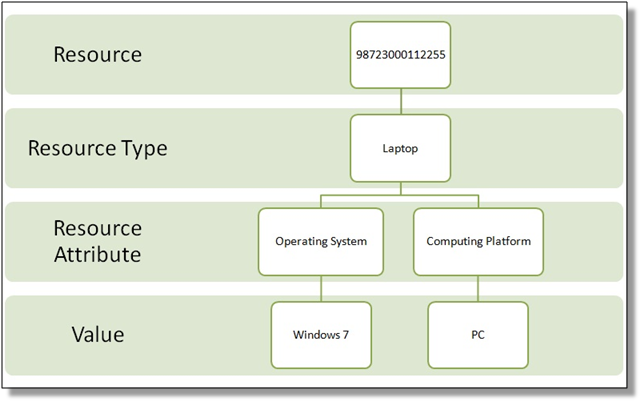
Once all attributes have been mapped your resource will be part of a hierarchy similar to the example below.
To report a problem with this documentation or provide feedback, please contact the DIG mailing list.
© 2008-2015 GPLS and others. The Evergreen Project is a member of the Software Freedom Conservancy.
